Recently I had seen Graciany Miranda posting a video of him brewing on a little electric kettle and I was quite impressed by the vigorous boil that he had going. So I had asked what he was using, and it turned out to be the Gigawort from Northern Brewer. After being impressed with the power of this little guy, I asked if I could give it a test drive. So here is my review of the Gigawort Homebrew System.


The Unit Itself
The Gigawort is built out of stainless steel, and has a beautiful mirror like finish. This really makes the whole unit quite attractive, but incredibly difficult to keep in showroom condition. When I received the unit it had been previously used, and needed a good cleaning prior to taking any pictures. You essentially need to clean it section by section, and dry it with a microfiber before it air dries. Or you can use a stainless steel cleaner, but I advise staying away from those as chemicals and beer don’t mix in my opinion. Even though its on the outside of the brewer, I just don’t like the idea.
It holds 4.4 gallons, and has really nice graduated volume markers on the inside of the boiler. This makes tracking your volumes really simple, however it would be nice to have quarter gallon markings as well. It does have gallon and half gallon markings though, so you can eyeball it pretty easily. The inside is quite reminiscent of a coffee urn.
The brewer comes with two heating elements which are controlled by the two switches on the side. There is an On / Off switch which controls the whole unit, and then a 1600W / 600W switch to chose which element is being used. The switches are well protected from liquid by nice soft plastic covers.
Lastly the brewer has a small digital controller. This controller is honestly very similar to what you would see on a Robobrew or a Grainfather. I honestly think that if you were to take the controller apart you would probably find that the guts are the same. They even share extremely similar error codes which I will delve into in another section.
Brewing with the Gigawort
Brewing with the Gigawort is really simple, and fast. Both times that I used the Gigawort, I brewed after work which I typically would never do on my big system. I would measure out the mash water, and start the brewer at 6:00pm, and by around 6:20 I would be doughing in my grains. To achieve this quick time, I would use hot water from my faucet which is 110ºF and then flip on the 1600W element to get it up to the strike temp of 157ºF. At that point I put the custom built brew bag and mashed in. This brought my mash temp down to 152ºF which was perfect. Place the lid on, and set a timer using Alexa on the Amazon Echo Dot.
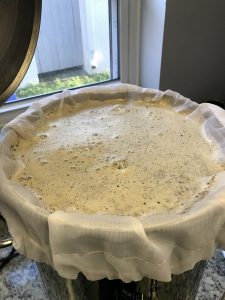
The beer that we are brewing in this picture was a Roggenbier which was set to be a 2.5 gallon batch. In this picture you can see that we have a pretty full mash as this recipe calls for 5lbs 12oz of grain and 4.125 gallons of water.
During the Mash phase I did notice some significant temperature fluctuations. I honestly wasn’t expecting that. Apparently the Gigawort will allow the temperature to drop 6º before it will fire the element back up. So I had seen the mash temp drop as low as 146ºF which I wasn’t all that crazy about. Once it would turn on, you would then see the brewer pass the target temp, turn off the element and the temp would continue to rise. So this really reiterates the importance of stirring your mash regularly if for anything else besides efficiency.
Once the Mash phase was done, I pulled the bag out of the brewer, and then placed it inside of a metal colander which I sat on top of the brewer so it could drain. Super simple! No pulley system required as the grain bill is very small. On this brew we landed a whopping 83% mash efficiency.


The boil was quite simple. You set the controller to 218ºF with the 1600W element turned on. This will take you from Mash temp to a boil in about 20 or so minuets. Once the boil started, it is quite a vigorous boil and will maintain this boil for the whole time.

Cooling the wort is quite simple. When the boil had about 10 min left I placed my standard immersion chiller into the brewer, and it fit like a glove. This chiller was not purpose built for the Gigawort, and it did not come with it. Once the boil was done, we carried the Gigawort outside and connected the chiller to my hose. We stirred the wort constantly for the chilling process and with Florida ground water at 80ºF we were able to get the wort down to about 85º in around 7 minuets. Talk about super quick! But again, it was a half batch, so not much to chill.
Clean up is a breeze, wash it out in the sink, and if you like you can use your favorite cleaner such as PBW. The biggest thing to remember however is to not submerge the base in water as there are electronics in there.
Pros:
I really, really like the Gigawort. The compact size of the device, and overall simplicity of it make it a great choice for someone with a limited amount of space.
The price is also something to talk about. It is only $215 from Northern Brewer (when they are in stock). The ability to setup and brew a batch of beer in about 4.5 hours is great. Especially when the clean up is quick and you can do it all in the comfort of your kitchen.
The unit runs on your standard 120v wall outlet, and is able to achieve temps quite quickly. This makes brewing a 2.5 gallon batch of beer after work a breeze, and quite enjoyable.
Cons:
The unit does have a few downsides though. I found that the inconsistency of the temp during the mash to be more of a nuisance than anything. It did not impact the beer however.
Another issue that I ran into was an ER4 error. This happened on my second use of the kettle. The ER4 error is a Run Dry protection error. Essentially during my boil, about 30 min into it, the system thought that it was running out of liquid which it was not. So when the ER4 error occurred, it turned the element off and made a beeping sound. Turns out that when this happens, you must unplug the brewer, and press and hold a rather uncomfortable reset pin which is located on the underside of the Gigawort. This was a pain to say the least. I ended up having to do this multiple times through the second half of my brew day and ultimately just gave up with about 5 min remaining. Once we chilled the wort and transferred it to the carboy it was very clear what had happened. The wort scorched to half of the bottom of the kettle. My guess is that we didn’t stir it often enough, to keep proteins and hop trub from settling on the bottom.
The brewer is a bit difficult to clean on the outside. It is a highly polished black stainless steel which is beautiful. But very hard to keep spotless. You pretty much need to wipe down with a wet cloth, and then once that spot is clean dry it immediately with a dry cloth, then move onto the next section. Kinda tedious.
Overall impression
Like I said in the Pros section, I really like this little brewer. It makes whipping up a batch of beer a simple, and enjoyable process. I am honestly thinking about getting one to compliment my larger system because there are sometimes I just don’t want to lug all of that equipment out. This makes brewing a beer after work a breeze and quite enjoyable.
I hope that you found my review of this product helpful. If you like it, please share it with your friends and fellow brewer.